Painting your kitchen cabinets is one of the fastest ways to update a tired kitchen without paying for a full remodel. A fresh coat of paint changes the entire feel of the room, and it costs a fraction of what new cabinets would run. This guide walks through exactly how to paint kitchen cabinets from start to finish, including the prep work that many tutorials skip over the part that has the biggest impact on how well the finish holds up over time.
The process below works on solid wood, oak, MDF, and most previously finished cabinet surfaces, as long as they’re properly cleaned and prepped first. White is a consistently popular cabinet color choice, so we’ll also cover how to paint kitchen cabinets white specifically, since white paint behaves a little differently than darker colors especially over oak grain or older brown finishes.
One thing worth setting straight before you start: the quality of a cabinet paint job depends heavily on preparation and drying time, not just on the paint itself. Rushing the surface prep or skipping recommended primer steps is one of the most common reasons DIY cabinet paint jobs don’t hold up as well as expected. If this is your first bigger DIY renovation project, our Home Edit Guide is a good starting point for planning timelines, budgets, and what to tackle first.
Can You Paint Kitchen Cabinets?
Yes most kitchen cabinet materials can be painted, including solid wood, oak, MDF, and many previously finished surfaces, though the prep steps needed vary depending on the material and existing finish.
Solid wood cabinets generally take paint well once cleaned, lightly sanded, and primed. Oak cabinets can be painted white, though the visible wood grain will typically show through slightly unless a grain filler is used first (more on that below). Brown cabinets, including older honey-oak or cherry-stained styles, can also be painted white, but they usually benefit from a stain-blocking primer so the tannins in the wood are less likely to bleed through your topcoat over time.
Previously painted cabinets can be repainted as long as the old finish is clean, sound, and lightly sanded for grip. Glossy or high-gloss cabinets are the trickiest case, because paint struggles to grip a slick surface these need a thorough scuff-sand and a bonding primer, or the new paint can peel within months.
The only surfaces that need extra caution are laminate or thermofoil cabinets, which require a specific bonding primer made for slick, non-porous materials. If you’re not sure what your cabinets are made of, a quick test patch on the inside of one door will tell you how the paint and primer behave before you commit to the whole kitchen.
What You Need to Paint Kitchen Cabinets
Having the right supplies on hand before you start saves you from stopping mid-project for a hardware store run which almost always means paint dries unevenly on whatever you left half-finished.
Cleaning and Preparation Supplies
- A degreasing cleaner (kitchen cabinets collect more grease than people expect)
- Microfiber cloths
- A sponge for scrubbing stubborn spots
- A large drop cloth to protect floors and countertops
- Painter’s tape for edges, walls, and hinges you’re not removing
Sanding and Painting Supplies
- Sandpaper or a sanding sponge (medium and fine grit)
- A quality bonding or stain-blocking primer
- Cabinet-grade paint (more on choosing this below)
- An angled paintbrush for corners and detail work
- A small foam roller for flat panels
- A paint tray
- A screwdriver or drill for removing hardware
Optional Tools
- A paint sprayer, for a smoother, factory-like finish
- Tack cloth to lift fine dust before painting
- Wood filler for dents, dings, or old hardware holes
Before You Start: Cabinet Painting Checklist
Running through this list before you open a paint can saves time and helps avoid the most common setbacks:
- Confirm your cabinet material (wood, MDF, laminate, thermofoil) so you can choose the right primer
- Clear the kitchen counters and set up a well-ventilated work area for doors and drawers
- Test your chosen paint and primer on an inconspicuous spot, such as the inside of one door
- Gather all cleaning, sanding, and painting supplies so you’re not stopping mid-coat
- Label doors, drawers, and hardware before removal
- Check the weather or room humidity if you’re painting near an exterior door or window, since high humidity slows drying
- Read the specific instructions on your primer and paint cans, since dry times and application steps vary by product and brand
Safety Tips Before You Paint
- Work in a well-ventilated area, and open windows or use a fan when using primer, paint, or degreasing chemicals, since many of these products release fumes.
- Wear gloves and, if you’re sanding an older painted surface, a dust mask this matters especially in homes built before 1978, where old paint layers may contain lead (see the EPA’s guidance on renovating pre-1978 homes if that applies to your kitchen).
- Keep paint, primer, and cleaning products away from children and pets, and store open cans away from any heat source.
- Dispose of oily rags, sanding dust, and empty paint cans according to your local municipality’s hazardous waste guidelines rather than regular trash.
- Use a stable ladder or step stool for upper cabinets rather than standing on a chair or countertop.
How to Paint Kitchen Cabinets
This is the core process. Follow these steps in order skipping ahead is where most paint jobs go wrong.
1. Remove Cabinet Doors and Hardware
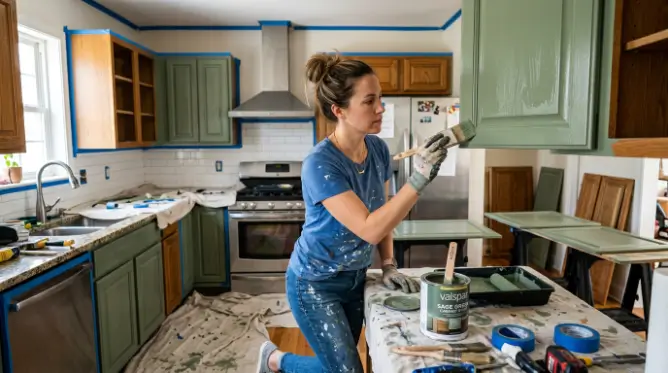
Take off every door and drawer front, along with knobs, pulls, and hinges wherever it’s practical to do so. Label each door and its matching hardware with masking tape and a number system, since cabinet openings are rarely perfectly identical and doors can end up not closing flush if they get mixed up. Lay the doors flat on a covered table or sawhorses painting cabinet doors while they’re standing upright almost always leads to drips along the bottom edge.
2. Clean and Degrease the Cabinets
This step matters more than people expect. Kitchen cabinets sit close to the stove and constantly collect airborne grease, cooking residue, and everyday dirt, even on surfaces that look clean. Paint will not bond properly to a greasy surface, no matter how good the paint is it will simply sit on top of the residue and eventually peel or bubble.
Wipe every surface down with a degreasing cleaner, paying extra attention to areas near the stove and above the sink. Let everything dry completely before moving to the next step; sanding over a damp surface just smears grime around instead of removing it.
3. Repair Imperfections
Fill dents, small holes from old hardware, and any cracks with wood filler. Let it dry fully, then sand it flush with the surrounding surface. If you’re changing hardware placement or switching from knobs to pulls, this is the point to fill the old holes before priming patched areas are much harder to hide once paint is already on.
4. Sand the Cabinets (in Most Cases)
For most surfaces, a light sanding pass creates a slightly rough surface (often called “tooth”) that paint and primer can grip more effectively. You generally don’t need to sand cabinets down to bare wood a light, even scuff-sand across every surface is usually enough for wood or previously painted cabinets. Glossy finishes typically need more attention, since the smooth coating resists paint more stubbornly than a matte one. Some primers marketed as “no-sand” or bonding formulas are designed to skip this step on certain surfaces, so check your specific product’s instructions if you’re hoping to avoid sanding.
The right grit depends on your existing finish and the primer you’ve chosen, so check the recommendation on the product label. Once you’re done sanding, wipe every surface with a tack cloth or slightly damp cloth to remove the fine dust leftover dust under paint can create a rough, gritty texture that’s hard to fix later.
5. Apply Cabinet Primer (Recommended for Most Projects)
Primer is generally recommended because it can make a meaningful difference in how well paint adheres and how long the finish holds up. A bonding primer helps paint grip slick or glossy surfaces, while a stain-blocking primer helps keep old wood tannins, water stains, or smoke residue from bleeding through your new color this matters especially if you’re painting darker or oak cabinets white, since discoloration showing through white paint tends to be noticeable. Some modern “paint-and-primer-in-one” products claim to skip this step, though results can vary by surface, so it’s worth checking product reviews or the manufacturer’s own recommendations for your specific cabinet material before deciding to skip a separate primer.
Apply an even coat and let it dry according to the can’s instructions dry times vary by brand and product, so always check the label rather than assuming a standard time. Don’t rush this step; primer that hasn’t dried properly won’t hold your topcoat well.
6. Lightly Sand the Primer
Once the primer is dry, run your hand over it to check for rough spots, drips, or brush marks. A very light sanding with fine-grit paper smooths these out. Wipe away the dust afterward, but be careful not to sand all the way through the primer layer you’re smoothing it, not removing it.
7. Apply the First Coat of Paint
Use an angled brush for corners, edges, and any recessed panel detail, and switch to a small foam roller for the larger flat sections rollers leave a smoother, more even finish than a brush on wide surfaces. Apply the paint in thin, even coats. Thick coats feel like they’ll save time, but they actually take longer to dry, are more prone to drips, and often cure unevenly.
8. Apply the Second Coat
Let the first coat dry completely before touching it again this usually takes longer than people expect, especially in humid kitchens. Lightly smooth any imperfections if needed, then apply your second coat the same way. Step back and check the coverage in natural light; white paint especially can look streaky under artificial light even when it’s fully covered, so check a few times of day before deciding whether a third coat is necessary.
9. Let the Cabinets Dry and Cure
This is the step almost everyone gets wrong. Dry and cured are not the same thing. Paint might feel dry to the touch within a few hours, but it can take several weeks to fully cure and reach its maximum hardness. Reinstalling doors and using cabinets heavily before the paint has cured is the most common reason painted cabinets chip, dent, or stick to the frame early on. Always follow the drying and curing times listed on your specific paint can rather than going by feel.
How to Paint Kitchen Cabinets White
White is a consistently popular cabinet color choice; it brightens small kitchens, pairs with almost any countertop or flooring, and tends to feel timeless rather than trend-driven. But going white comes with a few extra considerations compared to darker colors.
Can You Paint Oak Kitchen Cabinets White?
Yes, oak cabinets can be painted white, and it’s one of the most common cabinet makeovers homeowners do. The challenge with oak specifically is its visible grain pattern even under white paint, the texture of the wood will typically still show through slightly, giving the cabinets a bit of dimension rather than a completely flat, smooth look. Grain filler and primer are two different products that serve different purposes: a wood grain filler is applied first to physically fill the pores and texture of the oak, creating a smoother base, while primer goes on after to help the paint adhere and to block any stains from showing through. If you want a smoother, less textured white finish, apply a grain filler before priming. If you don’t mind a subtle textured look, a standard primer alone followed by two coats of paint will usually do the job.
Can You Paint Brown Kitchen Cabinets White?
Brown and honey-toned cabinets can absolutely be painted white, but they need extra attention to primer. Darker wood tones and older stains contain tannins that can bleed through lighter paint colors over time, showing up as faint yellow or brown patches months after painting. A dedicated stain-blocking primer prevents this, and it’s worth the extra step rather than skipping straight to paint.
Can You Paint Glossy Cabinets White?
High-gloss cabinets can be a challenging surface to paint successfully because the slick coating resists adhesion. Degreasing thoroughly, sanding to dull the sheen, and using a bonding primer designed for glossy or laminate surfaces all help skipping these steps raises the risk of the new paint peeling or chipping sooner than expected, especially on doors that get opened and closed daily.
Can You Repaint White Kitchen Cabinets That Have Already Been Painted?
Yes. Repainting makes sense when cabinets are chipping, have yellowed over time, show stains that won’t clean off, or you simply want a different shade of white. As long as the existing paint is clean, sound, and lightly sanded, you can paint right over it without stripping back to bare wood.
How to Choose White Paint for Kitchen Cabinets
Not all whites read the same once they’re on cabinets, which is why picking a shade off a small paint chip can be misleading.
Bright White vs. Warm White
Bright, cool whites tend to feel crisp and modern, and they pair especially well with gray, black, or stainless steel accents. Warm whites lean slightly cream or beige and feel softer, working well with wood tones and traditional kitchen styles. Neither is objectively better; it depends on the room’s natural light and the other finishes in the kitchen.
Popular White Cabinet Paint Colors
A few shades come up again and again in kitchen renovations, including Benjamin Moore’s White Dove, Chantilly Lace, and Simply White, along with Super White as a crisper, brighter option. These are popular because they’re versatile, but the way any of these whites actually looks in your kitchen depends heavily on your lighting and the undertones of your countertops and flooring. For a closer look at how different shades read in real kitchens, our white kitchen cabinets gallery is a good place to compare options before you buy paint. It’s worth painting a large test swatch on your actual cabinets, not just a wall and checking it morning, afternoon, and evening before committing to a full paint job.
What Type of Paint Is Best for Kitchen Cabinets?
Beyond finish (sheen level), the paint’s underlying formula also matters:
- Waterborne acrylic/latex enamel is the most common choice for DIY cabinet projects today. It dries faster, has lower odor, cleans up with water, and modern formulas have closed much of the durability gap with oil-based paint.
- Alkyd (oil-modified waterborne) enamel is a hybrid option that self-levels well, giving a smoother, brush-mark-free finish, while still cleaning up more easily than traditional oil paint.
- Oil-based enamel is known for a very hard, durable finish, but it has a stronger odor, a longer dry time, and requires mineral spirits for cleanup; it’s less commonly used by DIYers now that waterborne options have improved.
Cabinet-grade or “cabinet and trim” paint lines (offered by most major paint brands) are formulated specifically for the heavy daily use cabinets get, and they generally outperform standard wall paint in this application, regardless of which underlying formula you choose.
What Paint Finish Is Best for Kitchen Cabinets?
Satin finishes offer a soft, low-sheen look and hide small imperfections well, making them a common choice for a more relaxed style. Semi-gloss is more durable and easier to wipe clean, which matters in a high-traffic kitchen. High-gloss gives the most polished, reflective look but shows every fingerprint and brush mark, so it demands the most careful application. There’s no single “best” finish; it’s a trade-off between durability, cleanability, and the exact look you’re after.
How to Clean White Kitchen Cabinets
White cabinets show dirt more visibly than darker colors, so a light, consistent cleaning routine keeps them looking fresh without wearing down the paint.
How to Clean White Painted Kitchen Cabinets
For regular upkeep, dust cabinet fronts with a dry microfiber cloth to prevent buildup. For grease near the stove, use a mild soap-and-water solution or a gentle degreasing spray, wiping in the direction of the grain rather than scrubbing in circles. Avoid abrasive scrub pads or harsh chemical cleaners, since they can dull the paint’s sheen or wear it thin over time. Always dry the surface afterward leaving moisture sitting on painted wood, especially around edges and seams, can eventually cause the finish to lift.
Cleaning product recommendations can vary by paint brand and finish, so it’s worth checking the care instructions from your specific paint manufacturer, or the cabinet manufacturer if the finish was factory-applied, before using any new cleaning product on a large area.
How to Clean White Cabinets That Have Yellowed
Yellowing on white cabinets usually comes from one of a few sources: built-up grease and cooking residue, general aging of the paint or clear coat, past exposure to smoke, or sun exposure that’s altered the finish over years. In many cases, a thorough degreasing clean will noticeably brighten cabinets that have simply dulled from daily cooking. But it’s worth being upfront that cleaning won’t fix true discoloration in the paint or topcoat itself if the yellowing is coming from the finish breaking down rather than surface grime, a fresh coat of paint is the only real fix.
What Colors Go With White Kitchen Cabinets?
White cabinets are flexible by design, but a few pairing decisions make the biggest visual difference in the room.
What Wall Color Goes With White Cabinets?
Soft neutrals work well without competing with white cabinetry, think warm greige, light gray, muted sage green, or a soft blue for a bit of color without overwhelming the space. Cream or beige walls lean traditional, while a cooler gray feels more modern.
What Countertops Go With White Cabinets?
White countertops keep the kitchen bright and monochrome, while gray or black countertops add contrast and make the cabinetry pop. Marble-look quartz is popular for a classic, higher-end feel, and butcher block or natural wood countertops bring warmth into an otherwise all-white kitchen.
What Color Hardware Goes With White Kitchen Cabinets?
Black hardware creates strong, modern contrast against white cabinets. Brass and gold read warmer and more traditional. Chrome and brushed nickel are safer, more neutral choices that work with almost any style. Hardware color is one of the easiest and cheapest ways to change the entire feel of a white kitchen without repainting anything.
What Color Flooring Goes With White Kitchen Cabinets?
Natural or white oak flooring adds warmth to an all-white kitchen and is one of the most common pairings right now. Medium-toned wood works well for a more traditional look, while gray flooring or tile leans cooler and more contemporary.
What Backsplash Goes With White Cabinets?
Classic subway tile is the most common pairing for a reason it’s simple and never fights with the cabinetry. Marble-look tile adds a bit more texture and visual interest, while a patterned or colorful backsplash can act as the one bold element in an otherwise neutral kitchen.
White Kitchen Cabinet Design Ideas
If you’re still deciding on a direction, a few combinations consistently show up in well-reviewed kitchens many of them built around open kitchen concepts, where white cabinetry helps the whole space feel connected and bright:
- White and wood kitchens, pairing white cabinets with warm wood open shelving or a wood island see our kitchen island ideas for layout inspiration
- Black and white kitchens, using black hardware, fixtures, or a black island for contrast
- Gray and white kitchens, mixing white uppers with gray lower cabinets for depth
- Blue and white kitchens, often through a blue island or accent wall
- White cabinets with white countertops, for a fully monochrome, brightening effect
- Modern white kitchens, leaning on flat-panel cabinet doors and minimal hardware
- White shaker cabinets, a widely used and popular door style for its clean, versatile lines
- White oak paired with white cabinets, balancing crisp cabinetry with natural wood warmth
- Off-white kitchen cabinets, for a softer, slightly warmer alternative to true white
If you’re planning the layout alongside the color scheme, it’s worth looking at modern kitchen layouts for how cabinet placement affects flow, or small kitchen ideas if you’re working with limited square footage, since white cabinets are especially effective at making a compact kitchen feel larger.
Are White Kitchen Cabinets Still in Style?
Yes white kitchen cabinets remain one of the most consistently popular choices in kitchen design, and there’s no strong sign of that changing soon. Unlike more dramatic color trends that cycle in and out, white cabinetry has stayed a top choice for well over a decade because it’s flexible: it works with almost any countertop, flooring, or hardware finish, and it doesn’t date the way a bolder color can.
That said, “white” itself has evolved. Off-white and warm white tones have gained ground alongside classic bright white, and pairing white cabinets with a contrasting island or a two-tone kitchen has become a common way to keep an all-white kitchen from feeling flat. So while pure white-on-white kitchens are still common, many current kitchens use white as the dominant tone with one contrasting element for visual interest.
Are White Kitchen Cabinets a Good Idea?
For most homes, yes. White brightens a room, works as a neutral backdrop for almost any style, and is easy to update around later with new hardware, backsplash, or countertops without a full repaint. The main trade-off is maintenance white simply shows dirt, grease, and fingerprints more visibly than a darker color.
Are White Kitchen Cabinets Hard to Keep Clean?
White cabinets simply show dust, grease, and fingerprints sooner than darker cabinets that’s a visibility difference, not a durability one. A quick wipe-down every week or two, plus a proper degreasing clean near the stove, keeps them looking fresh. The marks show up sooner on white, but they’re just as easy to remove.
Do White Kitchen Cabinets Get Dirty Easily?
Marks and smudges show up faster on white than on a mid-tone or dark cabinet, simply because there’s more contrast. That doesn’t mean they get objectively dirtier, it just means the same amount of daily grime is more visible.
Do White Kitchen Cabinets Chip?
Any painted cabinet can chip with enough wear, especially near handles and high-touch edges. Chips are simply more noticeable on white because of the contrast if the substrate underneath is a different color. Using a quality cabinet-grade paint and letting it fully cure before heavy use can help reduce how often chipping happens over time, though no painted finish is fully chip-proof.
Pros and Cons of White Kitchen Cabinets
Pros
- Brightens the kitchen and can make small spaces feel larger
- Pairs easily with almost any countertop, flooring, or backsplash
- Works across traditional, modern, and transitional kitchen styles
- A neutral choice that’s generally easy to design around, both now and if you update other finishes later
- Easy to refresh the look later just by changing hardware or paint color elsewhere
Cons
- Shows dirt, grease, and fingerprints more visibly than darker colors
- Some white finishes can yellow over time, especially near the stove
- Chips and scuffs are more noticeable against a light background
- Tends to need a bit more routine wiping and spot-cleaning to stay looking crisp, since marks are more visible
- Choosing the wrong white undertone for the room’s lighting can look off
How Much Does It Cost to Paint Kitchen Cabinets White?
Costs vary widely depending on whether you DIY the project or hire a professional, and by region. Based on 2026 pricing data from home-improvement cost guides such as HomeGuide and Angi, professional cabinet painting commonly falls in the $2,000–$6,500 range for an average kitchen, with smaller kitchens costing less and larger or more detailed cabinet systems running higher. These figures are national estimates and change over time, so always get a current, written quote from a local painter for your specific kitchen rather than budgeting off any online range.
| Approach | Typical Cost Range (US, based on 2026 industry cost guides) | Notes |
| DIY | $200 – $800 | Covers primer, paint, supplies, and tools for an average kitchen |
| Professional painting | $2,000 – $6,500 (up to $9,000+ for large or high-end kitchens) | Varies by cabinet count, condition, finish, and region |
| Cabinet refacing (alternative) | $4,000 – $9,000+ | Sometimes considered instead of paint for heavily damaged cabinets |
A few factors that move the price up or down:
- The number of cabinets and doors involved
- The current condition of the cabinets (glossy, damaged, or heavily stained surfaces take more prep time)
- The material laminate and thermofoil often need specialized primers
- How much prep work is required before painting
- The quality of paint used, since cabinet-grade paints cost more than standard wall paint
- Labor rates, which vary significantly by region and contractor experience
- The number of coats needed for full, even coverage
DIY is significantly cheaper but takes more time and carries more risk if the prep steps get rushed. Hiring a professional costs more upfront but usually comes with a smoother, more durable finish, especially for glossy or heavily worn cabinets.
Not sure which way to go? If your cabinets are glossy, heavily damaged, or you’d simply rather not spend a weekend sanding, it’s worth getting a couple of quotes from local cabinet painters before deciding to offer a free in-home estimate, and comparing a real quote against the DIY cost above makes the decision easier.
Common Mistakes When Painting Kitchen Cabinets
A lot of DIY cabinet paint jobs fail for the same handful of avoidable reasons:
Skipping Degreasing
Grease left on the surface prevents paint from bonding properly, no matter how many coats you apply.
Painting Without Proper Surface Preparation
Skipping the sanding step, even lightly, leaves paint with nothing to grip onto, especially over glossy or previously sealed finishes.
Using the Wrong Primer
A standard wall primer isn’t built for cabinet surfaces or for blocking stains from bleeding through, particularly on oak or dark-stained wood.
Applying Thick Coats
Thicker coats feel efficient but dry unevenly, drip more, and often take longer to cure than two or three thin, even coats.
Reinstalling Doors Too Soon
Paint that feels dry to the touch may not be fully cured. Rehanging doors early is one of the most common causes of sticking, chipping, or dents right after a paint job.
Ignoring Cabinet Hardware
Painting around old, worn, or mismatched hardware can make an otherwise great paint job look unfinished. It’s worth deciding on hardware even if you’re keeping the old pieces before the final coat goes on.
Choosing White Paint Without Testing It
Because white shifts noticeably under different lighting, skipping a test swatch is one of the more common regrets homeowners have after painting.
How Long Does It Take to Paint Kitchen Cabinets?
| Stage | Typical Time Consideration |
| Cleaning | Depends on grease buildup and cabinet condition |
| Sanding/prep | Depends on the current finish (glossy takes longer) |
| Priming | Dries per product label, often several hours |
| Painting | Usually two coats, each needing full dry time between |
| Drying | Follow the paint manufacturer’s instructions |
| Curing | Can take several weeks beyond the initial dry time |
It’s realistic to expect the hands-on painting itself to take a weekend, but the full project including proper drying and curing before heavy use often stretches closer to one to two weeks from start to finish. Rushing this timeline is where most early paint failures come from.
How to Maintain Newly Painted Kitchen Cabinets
- Wipe up spills and splatters quickly rather than letting them sit
- Clean with a gentle, non-abrasive method rather than harsh scrubbing
- Avoid slamming doors or drawers, especially in the first few weeks after painting
- Touch up small chips early before they spread or collect grime
- Follow the paint manufacturer’s specific cleaning recommendations for that product
Frequently Asked Questions
Can I paint my kitchen cabinets white?
Yes, most cabinet materials including wood, oak, and MDF can be painted white with proper cleaning, sanding, and primer.
Can I paint oak kitchen cabinets white?
Yes. The wood grain may show through slightly under the paint. Some homeowners like this subtle texture, while others reduce it by applying a wood grain filler before priming and painting.
Can I paint over high-gloss kitchen cabinets?
Yes, but it requires thorough degreasing, a scuff-sand to dull the sheen, and a bonding primer designed for glossy surfaces.
Do I need to sand kitchen cabinets before painting?
In most cases, yes a light sanding helps paint and primer grip the surface properly, even on previously painted cabinets. Some bonding primers are formulated to reduce or skip this step on certain surfaces, so check your product’s label.
Do I need primer before painting kitchen cabinets?
Primer is recommended for most projects because it improves adhesion and, on darker or stained wood, helps block tannins from bleeding through your topcoat over time. Some paint-and-primer-in-one products claim to skip this step, though results can vary, so check the manufacturer’s guidance for your surface.
What is the best paint for kitchen cabinets?
Cabinet-grade paints in a satin, semi-gloss, or high-gloss finish tend to hold up best, since they’re formulated for durability and frequent cleaning.
How many coats of paint do kitchen cabinets need?
Most projects need two coats for full, even coverage, though very dark original colors under white paint sometimes need a third.
How long should painted cabinets dry before reinstalling?
Follow the manufacturer’s drying time on the can, but plan for at least a few days before rehanging doors and longer before heavy daily use, since full curing takes longer than surface drying.
Are white kitchen cabinets hard to keep clean?
Not particularly marks just show up sooner on white than on darker cabinets because of the contrast, not because white gets objectively dirtier. Wiping them down every week or two, with a proper degrease near the stove, is usually enough to keep them looking fresh.
Are white kitchen cabinets still in style?
Yes, white cabinetry has remained one of the most consistently popular kitchen choices for years, though warm whites and two-tone pairings have become more common alongside classic bright white.
What color hardware goes with white kitchen cabinets?
Black offers modern contrast, brass and gold lean warmer and more traditional, and chrome or nickel work as neutral, versatile options.
What countertops go with white cabinets?
White, gray, black, marble-look quartz, and butcher block all pair well, depending on whether you want a monochrome look or added contrast.